Just a short update on the 1400CS restoration project. As of the last post from long ago, I had successfully swapped out the broken trackpad but started to have issues with certain keyboard keys not working. I ended up disassembling the PowerBook one more time and cleaning out the keyboard slot on the laptop's motherboard. I used a little bit rubbing alcohol and a soft lint cloth to clean out the slot as well as sprayed it with a can of compressed air for good measure. Either way, those two things seemed to have done the trick! All keys are functional and I am officially stoked.
Once I was able to restore all functionality to the keyboard I started to research what kinds of PCMCIA Ethernet cards would work with the PowerBook. To make a long story short, I eventually learned about a particular card and adapter that would work with the 1400CS PowerBook. I purchased an Asante FriendlyNet Ethernet PCMCIA/Cardbus Adapter for PC and Mac on eBay for a measly $7.00. The immediate mark of compatibility on the included box brought my hopes up. I read through the included documentation, ran through the included installer and installed the necessary extension into my system's Extensions folder, but still no go, even after a reboot. Honestly, I have no idea of what I am doing as this is my first real go with an older version of Mac OS. I have also purchased a Transcend PCMCIA ATA Adapter that should convert a CompactFlash CF Card to work in the other PCMCIA slot. We will see though.
Anyways, the previous owner of this old gem did not bother wiping the hard drive, so it is still running an old version of Mac OS 8 and includes software such as Photoshop, an ancient version of Microsoft Office for Mac, and VirtualPC to name a few. When I started up VirtualPC it booted a Windows 95 VM and quite quickly for that matter. Not bad for this old beast of a laptop.
Lastly, and sadly, there is another reoccurring issue with the laptop that has been more than a little frustrating and unusual. My current theory is a bad PRAM battery and why would it not be considering the PowerBook's age. Here is what happens. I will be happily computing away (and by computing I mean trying to learn Mac OS 8) and the machine will completely lock up on me. I am unable to power off the laptop in any way, shape, or form other than to pull the charging cable and battery out at which point the unit still seems to have some form of power and current flowing through it as the green light on the lower right-hand side of the display is still illuminated. Only for a couple of minutes though. At this point, I usually leave it to sit for a couple of hours and then it works again for awhile.
On that same note, I am still searching for a working internal CD drive to use to install a Linux OS, but if nothing else, I will search for and use an external one somehow. I see WeLoveMacs have some in stock still, but its hard to justify paying $150 for one. The PowerBook already has a floppy drive installed, so I suppose I could utilize that for a Linux OS install although the complexity increases tenfold when going that route and I do not exactly have a huge handful of floppy disk lying around to make it happen.
Thoughts, ideas, comments, suggestions on these issues? I would welcome any and all.
Tuesday, December 29, 2015

Tuesday, October 20, 2015
Useful Twerks, I mean Tweaks
I know. Another long hiatus of no posts. Life has been a whirlwind with my second daughter being born pre-mature as well as me preparing myself for graduate school come this spring 2016. Regardless, I want to keep posting here as often as I can. So today, I thought I would write up a small post with a couple of updates on what I have been working on and cover a couple of useful tweaks I have discovered I could make on my Debian systems to improve useability and productivity.
The first tweak is targeted at just the iBook and PowerBook owners. Out of the box, the scroll direction feels unnatural and counterintuitive. Luckily, I was able to discover what trackpad settings could be used to reverse the scroll direction. Once in place, you should be able to pull down on the page and have the browser scroll up and vice versa. To put this configuration in effect, open up your synaptics.conf file and add the following lines:
Option "VertScrollDelta" "-111"

Option "HorizScrollDelta" "-111"
Once those two options have been added, reboot and enjoyed reversed scrolling.
The other tweaks I thought would be useful to share is the ability to spice up and add a bit of color to your bash shell. Add the following lines to either your
~/.bashrc file or /etc/bashrc.bash file.export LS_OPTIONS='--color=auto'
eval "`dircolors`"
alias ls='ls $LS_OPTIONS'To apply the changes, run the following command (assuming you edited the file in your home directory):
source ~/.bashrcWhy stop there though? If you are a heavy user of vim like myself, you have the ability to add highlighted syntax to your text editor. Browse to
/etc/vim/vimrc and uncomment the line below. You will need to make the edit as the root user if you do not already have root privileges.syntax onYep. That is it. The change is immediate.
These two colorful tweaks add a great amount of readibility within the terminal, especially the colored syntax highlights. Such a configuration makes it easy to spot typos within configuration files and code as well as pick out certain kinds of items with much more speed and agility.
In terms of new hardware, I have scored an ATI FireGL X3 graphics card with 256 MB of VRAM. This particular card is documented as being the second fastest graphics card available for G4 Quicksilvers. The fastest graphics card, the Nvidia GeForce 7800 GS, I also already own! Speaking of the Nvidia card, I have been able to get 2D acceleration working with the Nvidia Card as well using the procedure I explained in detail over at PowerPC Liberation, so hopefully I can post on that soon too. Before that though, I want to test the latest Rage 128 patch mentioned here to see what kind of performance I can manage with a nearly 15 year old card.
Speaking of graphics, a university also provided me with a couple of spare G4 towers and an older 17" Apple Studio Display with an ADC connector. When hooked up to my G4 Quicksilver project machine, it looks magnificent with its 1280x1024 resolution. The Apple Display Connector is a real bugger though as finder adapters for other display outputs is not as feasible and the Apple branded adapter costs well over $100.
Lastly, I also purchased some royal blue heatsinks for the QS's RAM and they look fantastic, but in terms of performance and temperature difference, I am not sure how they fare. Not only that, but I also scored a Sonnet Serial ATA PCI card for the G4 upgrade project. With that in mind, my next post should get us back on track with the Pimp My G4 Quicksilver project where I wrap things up with the CPU upgrade for the time being.
Wednesday, July 29, 2015
Pimp My Quicksilver - Part IV:B CPU
As promised, this particular post will be short and sweet. First off, I have had to drop the upgraded CPU clock speed back down to 1.33 GHz as so far it seems to be offering the most stability with both operating systems. Research in that department continues.
However, I was still allowed to move forward with the jump to a 32-bit SMP kernel within Debian. What follows is basically the 2 steps I had to take in order to do so. Even then it is nothing outrageous.
1. Run the following command to search for the most current and appropriate 32-bit SMP PPC kernel within the Debian repositories.
This should return a list of about 3 different kernel image packages as well as the corresponding meta-packages and headers for each of them. Look for the SMP image called
2. Install the SMP linux image. Right now the current version on my Debian Jessie install is 3.16.0-4.
After installing this image, I had no need to manually update my yaboot.conf file as that was done so automatically. Would not hurt to double check though to make sure the default kernel is now your SMP one.
3. Reboot
Reboot your machine to allow it to boot using the newly installed multiprocessor capable kernel. Once you are logged in, there are multiple ways you can verify your system is now taking advantage of multiple CPUs, but I will cover the ones I am more familiar with. The first command you can run will help you verify that your system is seeing both CPUs.
Here are the results of mine:

Okay. Both CPUs are recognized, but are both being utilized by the running system? This is where the command line tool

Since both CPUs appear here with a % of use, we can be assured that both CPUs are being fully utilized by Debian. Great. How about we take it even one step further by looking at which CPU a particular process is running on? That would provide even more assurance and give us an idea of how and what work is divided up amongst the two CPUs. To do this, will need to use the
Look for the PSR column, which stands for processor. In our case, the resulting number will either be a 0 or a 1 since we only have 2 CPUs and numbering always starts at 0 in computer science. Here is a screenshot hightlighting the command running on the QS.

If you are curious, the
That is it for this post. I barely scratched the surface of what the
However, I was still allowed to move forward with the jump to a 32-bit SMP kernel within Debian. What follows is basically the 2 steps I had to take in order to do so. Even then it is nothing outrageous.
1. Run the following command to search for the most current and appropriate 32-bit SMP PPC kernel within the Debian repositories.
sudo apt-cache search linux-imageThis should return a list of about 3 different kernel image packages as well as the corresponding meta-packages and headers for each of them. Look for the SMP image called
linux-image-[insert version here]-powerpc-smp. You do NOT want the powerpc64 version as no G4 PowerMac or CPU upgrade for it was ever 64-bit capable. I have left the kernel image version out as it may vary over time.2. Install the SMP linux image. Right now the current version on my Debian Jessie install is 3.16.0-4.
sudo apt-get install linux-image-3.16.0-4-powerpc-smpAfter installing this image, I had no need to manually update my yaboot.conf file as that was done so automatically. Would not hurt to double check though to make sure the default kernel is now your SMP one.
3. Reboot
Reboot your machine to allow it to boot using the newly installed multiprocessor capable kernel. Once you are logged in, there are multiple ways you can verify your system is now taking advantage of multiple CPUs, but I will cover the ones I am more familiar with. The first command you can run will help you verify that your system is seeing both CPUs.
cat /proc/cpuinfo.Here are the results of mine:

Okay. Both CPUs are recognized, but are both being utilized by the running system? This is where the command line tool
top can come in and provide this information. In a terminal, simply type top and you should see a great deal of information and usage statistics about your running system. You can type the 'h' key for help on different options you have at your disposal for arranging the layout of the information provided by top as well as what information is displayed. We want to hit the '1' key to provide usage statistics on separate CPUs as can be seen from this screenshot:
Since both CPUs appear here with a % of use, we can be assured that both CPUs are being fully utilized by Debian. Great. How about we take it even one step further by looking at which CPU a particular process is running on? That would provide even more assurance and give us an idea of how and what work is divided up amongst the two CPUs. To do this, will need to use the
ps command line tool. This tool basically provides a snapshot of your system's running processes. Again, while in a terminal, type the following and hit Enter:ps -eFLook for the PSR column, which stands for processor. In our case, the resulting number will either be a 0 or a 1 since we only have 2 CPUs and numbering always starts at 0 in computer science. Here is a screenshot hightlighting the command running on the QS.

If you are curious, the
-e flag tells the system to include all processes and the -F flag stands for full format, which adds in some additional information to each listed process including the aforementioned PSR column.That is it for this post. I barely scratched the surface of what the
ps and top tools are capable of, so I would encourage to explore them further. All sorts of neat things are possible. The next (and last) post on the CPU upgrade will take a more in depth look at performance improvements in the system with more everyday tasks put to the test and some CPU spec comparisons.Tuesday, July 21, 2015
Pimp My Quicksilver - Part IV:A CPU
Welcome to part IV of the series on upgrading a G4 Quicksilver (QS). If you have stuck around this long, I think you will find that we will start to see some more substantial improvements in terms of overall performance with some of these next few upgrades. For this particular post, I will be focusing on upgrading the CPU. In fact, I will be breaking it down even further than that due to the fact that this particular upgrade has become quite a bit more work than I had originally anticipated. Needless to say, I have learned quite a bit along the way about jumpers, dip switches, voltage, etc.
I was excited about this upgrade as I knew it would do wonders for the QS and upfront I will state I was not disappointed, but more on that in a later post. The stock 7447 G4 Motorola CPU running at 800 MHz was just not cutting it even for tasks as simple as installing updates via apt-get in Debian. As I stated in an earlier post, I was lucky enough to locate a dual 1.4 GHz Giga Designs 7457 CPU upgrade on eBay for quite cheap. In fact, I have been tracking a large number of single and dual CPU upgrades for G4 PowerMacs on eBay these past couple of months, so if you are on the hunt for one, definitely take advantage of this fact as they can sometimes sell quick! Not only that, but these upgrade gems are becoming harder and harder to come by.
Consider this post the first of 3 regarding the upgrade and the processes and procedures it involved. Part IV:A will cover that actual hardware side of the upgrade including the steps taken to swap out the CPU and the different voltages/jumper and dip switch settings I needed to set. Part IV:B will cover the upgrades needed to jump from a single CPU PowerPC kernel to a 32-bit SMP PowerPC kernel within Debian and how to verify it was successful afterwards. And finally, Part IV:C will cover some basic benchmarks from OS X and Debian both to provide a bit of an idea of just how much faster the machine has become.
So onto the upgrade. The easiest part of this whole process was the steps to take out the old stock CPU and swap in the M5D-1214U Giga Designs dual 1.4 GHz 7457 CPU, which happened to be the first thing I did not really knowing what I was up against. I followed the steps from iFixit's website for swapping out the CPU here. The new dual processor CPU also has the luxury of having dual fans built on top of it for cooling, so I was able to permanently remove the small 60mm fan that resided behind the old CPU. I would be able to leave it there with the new one, but I will closely monitor temperatures with and without it. This particular upgrade does not require all 4 of the screws you removed from the old CPU, but only 2 of them, but keep the other ones handy just in case. Once I successfully swapped out the CPU and plugged in power to its fans, I closed the G4 up and tried to boot the machine. Sadly, nothing. No boot up chime, bong, whatever you want to call it. I probably pushed the power button 6 or 7 times just hoping it would take off, but that would be too easy.
Long story short, my system needed a particular firmware upgrade that would add support for the 7457 CPU series. Finding this particular upgrade version proved to be incredibly difficult to find as well figuring out which particular version I needed. I first posted to Apple's discussion forums asking anybody if they had any version of the installer laying around they could email me. A user did respond with a link to the Mac Driver Museum that is hosted over at Yahoo that held a few different Giga Designs pieces of software and upgrades under the folder appropriately named CPU Upgrades. You will need a Yahoo account to access these files, which is a bit of a pain in my mind, but I ponied up and created an account. At the time, the only firmware updater version available was 2.0.1. Looking back on things now I see the description says it adds support for 7447A CPUs, which was not was I was upgrading to, but that small tidbit did not click with me at the time.
I downloaded the disk image, extracted it, and copied the files to a separate folder for safe keeping. The firmware update utility, Giga Designs 7447A Updater, was straightforward enough. Here is a screenshot of the main screen you will see during the upgrade.

The default selection of "Install 7447A Firmware Update" is what you would want if you were actually needing this particular upgrade. When you are ready, hit the Continue button and let the software do its magic as I did.
After running this firmware upgrade and rebooting, I again swapped out the CPU, but still no sign of any life. I did some more research online and decided it might be because I needed firmware installer version 3.0.1. I mentioned this in the same Apple Support community discussion I had already started and the same individual who commented previously pointed me to a discussion thread at MacGurus.com where somebody asked for version 3.0.1 as well, which I learned added support for the 7457 CPU upgrades. Bingo!
I responded to the thread asking if anybody would be able to provide me with the same firmware update and within 48 hours I received a personal email from one of the moderators with the update utility included as an attachment. Before I did anything with this version of the updater, I uploaded this piece of software to the Mac Driver Museum file repository for anybody else ever needing it in the future.
To run this particular upgrade, you can simply extract the files from the .sit archive and run the lone Giga Designs Updater 3.0.1 package. Here is a quick screenshot of the installer. As straightforward as can be, so I will not cover it step-by-step.

Unfortunately, and frustratingly, still no signs of life after booting up the machine with the Giga Designs CPU in place and freshly installed firmware update. However, I remembered reading a bit more from that same MacGurus thread about different voltage settings you could set on the CPU. Here is a table summarizing those different voltages and how to obtain them.

I thought perhaps the voltage was not set correctly and sure enough, the current setup I had for J6 - J10 was not in the table above. I decided to start with a voltage of 1.55 as 1.6 and 1.65 seemed a bit extreme for a noob like myself. This is where I realized and learned there are also dip switches for J1 - J5 that controlled the CPU's clock frequency. So this meant I would have to also play around with those as well to see which combination of the 5 would give me 1.4 GHz. After scouring the web for some time, I gave up the search for any sort of table showing possible combinations and resulting frequencies. If anybody reading this has this information available, please (I cannot say it enough) share!
Since I was not able to obtain this information, I decided to starting building a list of tables with this information myself. There are still many missing results and a lot of unanswered questions I have, but it is a worthy start. Knowing that each of the 5 dip switches had 2 possible states (either on or off) I could easily calculate the total number of possibilities as 2^5 or 32. Yes, that is basically binary numbers and mathematics at its finest. And with 7 different voltages to work with, I could theoretically have up to 224 possible combinations of states between J1 - J10 that could provide me with a working system and CPU. For now, I have only included my results for 1.55v, but eventually, I will link to a PDF showing results for all voltages along with notes regarding missing values, etc. I I have read that some frequency results may not be readable by OS X, but require an additional program called GigaMeter, which is available at the Mac Driver Museum as well, to show you what your CPU's clock speed is.
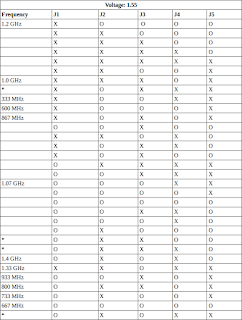
As you can see from the table above I have figured out what combination provides the full 1.4 GHz, but this was one of the results that required the GigaMeter KEXT to be installed otherwise the speed was reported as 0 MHz in OS X. On the other hand, Debian still reports 0 for clock speed, but neither OS has crashed on me yet so the stability is there. I will see if I can find anything online on to correct it within Linux. Some results produced kernel panics with both OS X and Debian and these are marked with an asterisk. Also marked with an asterisk are combinations that successfully produced a start-up chime but would not boot any further. And finally, as you probably have guessed, the blanks are combinations that produced nothing at all (i.e. no startup chime, boot up, etc).
Part of me wonders if I even needed the firmware upgrade for my QS, which was also mentioned by a moderator in the MacGuru's thread linked above. Either way, the CPU is still in place and running wonderfully at least on OS X Leopard. This conclusion will bring us to my next post in this series where I upgrade my Debian install to use a symmetric multiprocessing (SMP) kernel so it takes advantage of both CPUs for even better performance. Do not fret, this next post will be a hell of a lot shorter. :)
P.S. If you have any other additional info you can provide regarding the Giga Designs upgrades, feel free to leave comments below or shoot me a private email and I can add it to this post. I would love to make this process much simpler for those in the future. The Giga Designs company is now defunct, their website is gone, and the Way Back Machine could not help me locate the information I needed most as the necessary information used to be hosted in PDF form on their site.
I was excited about this upgrade as I knew it would do wonders for the QS and upfront I will state I was not disappointed, but more on that in a later post. The stock 7447 G4 Motorola CPU running at 800 MHz was just not cutting it even for tasks as simple as installing updates via apt-get in Debian. As I stated in an earlier post, I was lucky enough to locate a dual 1.4 GHz Giga Designs 7457 CPU upgrade on eBay for quite cheap. In fact, I have been tracking a large number of single and dual CPU upgrades for G4 PowerMacs on eBay these past couple of months, so if you are on the hunt for one, definitely take advantage of this fact as they can sometimes sell quick! Not only that, but these upgrade gems are becoming harder and harder to come by.
Consider this post the first of 3 regarding the upgrade and the processes and procedures it involved. Part IV:A will cover that actual hardware side of the upgrade including the steps taken to swap out the CPU and the different voltages/jumper and dip switch settings I needed to set. Part IV:B will cover the upgrades needed to jump from a single CPU PowerPC kernel to a 32-bit SMP PowerPC kernel within Debian and how to verify it was successful afterwards. And finally, Part IV:C will cover some basic benchmarks from OS X and Debian both to provide a bit of an idea of just how much faster the machine has become.
So onto the upgrade. The easiest part of this whole process was the steps to take out the old stock CPU and swap in the M5D-1214U Giga Designs dual 1.4 GHz 7457 CPU, which happened to be the first thing I did not really knowing what I was up against. I followed the steps from iFixit's website for swapping out the CPU here. The new dual processor CPU also has the luxury of having dual fans built on top of it for cooling, so I was able to permanently remove the small 60mm fan that resided behind the old CPU. I would be able to leave it there with the new one, but I will closely monitor temperatures with and without it. This particular upgrade does not require all 4 of the screws you removed from the old CPU, but only 2 of them, but keep the other ones handy just in case. Once I successfully swapped out the CPU and plugged in power to its fans, I closed the G4 up and tried to boot the machine. Sadly, nothing. No boot up chime, bong, whatever you want to call it. I probably pushed the power button 6 or 7 times just hoping it would take off, but that would be too easy.
Long story short, my system needed a particular firmware upgrade that would add support for the 7457 CPU series. Finding this particular upgrade version proved to be incredibly difficult to find as well figuring out which particular version I needed. I first posted to Apple's discussion forums asking anybody if they had any version of the installer laying around they could email me. A user did respond with a link to the Mac Driver Museum that is hosted over at Yahoo that held a few different Giga Designs pieces of software and upgrades under the folder appropriately named CPU Upgrades. You will need a Yahoo account to access these files, which is a bit of a pain in my mind, but I ponied up and created an account. At the time, the only firmware updater version available was 2.0.1. Looking back on things now I see the description says it adds support for 7447A CPUs, which was not was I was upgrading to, but that small tidbit did not click with me at the time.
I downloaded the disk image, extracted it, and copied the files to a separate folder for safe keeping. The firmware update utility, Giga Designs 7447A Updater, was straightforward enough. Here is a screenshot of the main screen you will see during the upgrade.

The default selection of "Install 7447A Firmware Update" is what you would want if you were actually needing this particular upgrade. When you are ready, hit the Continue button and let the software do its magic as I did.
After running this firmware upgrade and rebooting, I again swapped out the CPU, but still no sign of any life. I did some more research online and decided it might be because I needed firmware installer version 3.0.1. I mentioned this in the same Apple Support community discussion I had already started and the same individual who commented previously pointed me to a discussion thread at MacGurus.com where somebody asked for version 3.0.1 as well, which I learned added support for the 7457 CPU upgrades. Bingo!
I responded to the thread asking if anybody would be able to provide me with the same firmware update and within 48 hours I received a personal email from one of the moderators with the update utility included as an attachment. Before I did anything with this version of the updater, I uploaded this piece of software to the Mac Driver Museum file repository for anybody else ever needing it in the future.
To run this particular upgrade, you can simply extract the files from the .sit archive and run the lone Giga Designs Updater 3.0.1 package. Here is a quick screenshot of the installer. As straightforward as can be, so I will not cover it step-by-step.

Unfortunately, and frustratingly, still no signs of life after booting up the machine with the Giga Designs CPU in place and freshly installed firmware update. However, I remembered reading a bit more from that same MacGurus thread about different voltage settings you could set on the CPU. Here is a table summarizing those different voltages and how to obtain them.

I thought perhaps the voltage was not set correctly and sure enough, the current setup I had for J6 - J10 was not in the table above. I decided to start with a voltage of 1.55 as 1.6 and 1.65 seemed a bit extreme for a noob like myself. This is where I realized and learned there are also dip switches for J1 - J5 that controlled the CPU's clock frequency. So this meant I would have to also play around with those as well to see which combination of the 5 would give me 1.4 GHz. After scouring the web for some time, I gave up the search for any sort of table showing possible combinations and resulting frequencies. If anybody reading this has this information available, please (I cannot say it enough) share!
Since I was not able to obtain this information, I decided to starting building a list of tables with this information myself. There are still many missing results and a lot of unanswered questions I have, but it is a worthy start. Knowing that each of the 5 dip switches had 2 possible states (either on or off) I could easily calculate the total number of possibilities as 2^5 or 32. Yes, that is basically binary numbers and mathematics at its finest. And with 7 different voltages to work with, I could theoretically have up to 224 possible combinations of states between J1 - J10 that could provide me with a working system and CPU. For now, I have only included my results for 1.55v, but eventually, I will link to a PDF showing results for all voltages along with notes regarding missing values, etc. I I have read that some frequency results may not be readable by OS X, but require an additional program called GigaMeter, which is available at the Mac Driver Museum as well, to show you what your CPU's clock speed is.

As you can see from the table above I have figured out what combination provides the full 1.4 GHz, but this was one of the results that required the GigaMeter KEXT to be installed otherwise the speed was reported as 0 MHz in OS X. On the other hand, Debian still reports 0 for clock speed, but neither OS has crashed on me yet so the stability is there. I will see if I can find anything online on to correct it within Linux. Some results produced kernel panics with both OS X and Debian and these are marked with an asterisk. Also marked with an asterisk are combinations that successfully produced a start-up chime but would not boot any further. And finally, as you probably have guessed, the blanks are combinations that produced nothing at all (i.e. no startup chime, boot up, etc).
Part of me wonders if I even needed the firmware upgrade for my QS, which was also mentioned by a moderator in the MacGuru's thread linked above. Either way, the CPU is still in place and running wonderfully at least on OS X Leopard. This conclusion will bring us to my next post in this series where I upgrade my Debian install to use a symmetric multiprocessing (SMP) kernel so it takes advantage of both CPUs for even better performance. Do not fret, this next post will be a hell of a lot shorter. :)
P.S. If you have any other additional info you can provide regarding the Giga Designs upgrades, feel free to leave comments below or shoot me a private email and I can add it to this post. I would love to make this process much simpler for those in the future. The Giga Designs company is now defunct, their website is gone, and the Way Back Machine could not help me locate the information I needed most as the necessary information used to be hosted in PDF form on their site.
Sunday, June 28, 2015
PPC Linux Backups: Part I
So I've again taken an opportunity to step away from the G4 upgrades project as I have again become frustrated, this time with trying to make the upgraded CPU work. More on that when the post is completed and published.
I decided it would be more than worth it to put together a three part series on backing up your PPC Linux machines. I myself use of combination of PowerPC machines, including a G4 PowerBook, G4 PowerMac QS, dual core G5 PowerMac, and a G4 iBook. Much of the configurations between the 4 are quite similar, but different enough that I'd like the peace of mind knowing that these configurations and other valuable data are backed up and backed up on a scheduled basis. Part I will cover creating bootable hard drive clones; Part II will cover available software that could automate backups to an external drive or a storage location out on the network; Part III will cover how to create more of a DIY solution using custom scripts and automation tools. I'm going to refrain from using any cloud/offsite backup solutions as they usually cost money and require my personal information.
So onto Part I covering the process involved in creating an exact bootable clone of your existing hard drive. We are going to use the well-known and trusted command line tool dd to complete this task. This is quite the powerful tool that at its basic core simply reads and writes files. With this in mind, this tool should allow us to either make a copy of the entire drive or a single partition if we would like.
As an example, I am going to be cloning my 40 GB Maxtor HD in the G4 PowerMac GS containing my Debian install. I'm going to clone the entire drive instead of just specific partitions, so in essence, it should be an exact bootable clone. I would like to use a drive of the same vendor and capacity, but I do not exactly have many spare 3.5" IDE drives laying around, so for this task I am going to clone the existing drive to a 40 GB Western Digital (WD400JB/WD Cavier SE) HD. The QS has the ability to mount two IDE drives, but I already have both occupied, so I turned to my IDE/SATA to USB 2.0 adapter kit to attach the backup drive.
Below is a screenshot of my current Debian disk and its existing partitions and partition layout. After the cloning operation, which should expect to see the exact same layout on the hard drive clone.

Once your external drive is attached and recognized by your system, you will want to figure out its file name in
Now it is time to run the disk cloning command:
As you will notice, this command requires root privileges. The 'if" part stands for input file and if you are catching on, "of" stands for output file. We are not reading or writing just files, but technically a drive itself is a file (e.g.
The amount of time it takes to clone the drive or partition depends on both the size and speed of the drive, but expect it to take quite a bit of time. For this 40 GB drive clone, it took between 4-5 hours total (I did not time it, although I should for comparisons in drive read/write performance when upgrading to an SSD).
Here are the results from my cloning process:
As you can see there are no error messages, but simply a warning that the destination file ran out of space. This is because my Debian system sees the Maxtor as having 41 GB and the Western Digital as having a 40 GB capacity. Either way, there is no harm in this case. Here is a screenshot of the Western Digital HD after the clone.

I shutdown my system and pulled the live Debian HD and replaced it with the cloned Western Digital HD to test out the backup. Here is my last screenshot of this post showing us with WD drive booted and located at /dev/sda.

So a definite success. Now that I have this cloning process down, I will do the same with the other PPC machines and schedule it to be done on a periodic basis.
Of course, you'll want to tag team this backup approach with another such as backing up with a piece of backup software or writing shell scripts to do the backups for you, which again happens to be part II and part III of this series respectively. As I learned early on in computing, a smart man backups up his data, but a wise man makes backups for his backups.
I decided it would be more than worth it to put together a three part series on backing up your PPC Linux machines. I myself use of combination of PowerPC machines, including a G4 PowerBook, G4 PowerMac QS, dual core G5 PowerMac, and a G4 iBook. Much of the configurations between the 4 are quite similar, but different enough that I'd like the peace of mind knowing that these configurations and other valuable data are backed up and backed up on a scheduled basis. Part I will cover creating bootable hard drive clones; Part II will cover available software that could automate backups to an external drive or a storage location out on the network; Part III will cover how to create more of a DIY solution using custom scripts and automation tools. I'm going to refrain from using any cloud/offsite backup solutions as they usually cost money and require my personal information.
So onto Part I covering the process involved in creating an exact bootable clone of your existing hard drive. We are going to use the well-known and trusted command line tool dd to complete this task. This is quite the powerful tool that at its basic core simply reads and writes files. With this in mind, this tool should allow us to either make a copy of the entire drive or a single partition if we would like.
As an example, I am going to be cloning my 40 GB Maxtor HD in the G4 PowerMac GS containing my Debian install. I'm going to clone the entire drive instead of just specific partitions, so in essence, it should be an exact bootable clone. I would like to use a drive of the same vendor and capacity, but I do not exactly have many spare 3.5" IDE drives laying around, so for this task I am going to clone the existing drive to a 40 GB Western Digital (WD400JB/WD Cavier SE) HD. The QS has the ability to mount two IDE drives, but I already have both occupied, so I turned to my IDE/SATA to USB 2.0 adapter kit to attach the backup drive.
Below is a screenshot of my current Debian disk and its existing partitions and partition layout. After the cloning operation, which should expect to see the exact same layout on the hard drive clone.

Once your external drive is attached and recognized by your system, you will want to figure out its file name in
/dev. From my reading of the Debian installation guide, all disks detected by the system start with sd (I'm assuming this stands for SCSI device or something similar?) and the first drive is detected as a, the second b, third c, and so on. So for my setup, the external drive happens to be the third attached disk, so its filename is /dev/sdc.Now it is time to run the disk cloning command:
sudo dd if=/dev/sda of=/dev/sdcAs you will notice, this command requires root privileges. The 'if" part stands for input file and if you are catching on, "of" stands for output file. We are not reading or writing just files, but technically a drive itself is a file (e.g.
/dev/sda) within the EXT4 file system. Hopefully that makes sense. Your input and output files will vary depending on your system setup. If you need help identifying this information or if you are just wanting to copy certain partitions, leave me a comment below.The amount of time it takes to clone the drive or partition depends on both the size and speed of the drive, but expect it to take quite a bit of time. For this 40 GB drive clone, it took between 4-5 hours total (I did not time it, although I should for comparisons in drive read/write performance when upgrading to an SSD).
Here are the results from my cloning process:
dd: writing to ‘/dev/sdc’: No space left on device78165361+0 records in78165360+0 records out40020664320 bytes (40 GB) copied, 8500.46 s, 4.7 MB/sAs you can see there are no error messages, but simply a warning that the destination file ran out of space. This is because my Debian system sees the Maxtor as having 41 GB and the Western Digital as having a 40 GB capacity. Either way, there is no harm in this case. Here is a screenshot of the Western Digital HD after the clone.

I shutdown my system and pulled the live Debian HD and replaced it with the cloned Western Digital HD to test out the backup. Here is my last screenshot of this post showing us with WD drive booted and located at /dev/sda.

So a definite success. Now that I have this cloning process down, I will do the same with the other PPC machines and schedule it to be done on a periodic basis.
Of course, you'll want to tag team this backup approach with another such as backing up with a piece of backup software or writing shell scripts to do the backups for you, which again happens to be part II and part III of this series respectively. As I learned early on in computing, a smart man backups up his data, but a wise man makes backups for his backups.
Friday, June 12, 2015
Updates, Aliases, and Network No-Nos
Long time no post (at least it feels like that). My work on the graphics card upgrade was moving along quite nicely, but I've hit a brick wall after compiling the latest nouveau drivers/modules, libdrm, and mesa libraries. On the G5, I simply get an error regarding a GPU lockup, and a botched graphics glitch on the G4 with the updated kernel. Because of that, I've decided two things: 1) I'm going to work on the CPU upgrade next on the G4 and 2) I'm going to table the nouveau drivers project for just a bit and go with a Radeon 9800 Pro for an upgraded graphics card.
Right now, I feel like I'll have a better chance of getting 3D acceleration working with the nVidia Quadro card on the G5, so look for updates on that over on the PowerPCLiberation blog.
On an unrelated note, I want to take a few minutes to discuss command aliases you can setup for your bash shell environment. I've been meaning to do this on my Debian installs for some time as I've set them up on all the Linux machines at my full-time job. Basically you can create aliases to make shortened versions of longer commands you run on a regular basis. For example instead of typing the following:
You can shorten this command to simply the word
So for the example I provided above, I would set it up like so:
Upon saving the changes, you should immediately be able to make use of the new alias. To test it out type
Here are just a couple of others I usually implement on each of my installs.
They may not do a whole lot, but the small amount of time these aliases can save does add up over time in the same way the utility kupfer does. I'd encourage you to come up with your own. Feel free to share them in the comments below as they may be helpful for the rest of us.
Also, if you happen to run a really long command and say forgot to add sudo to the beginning of it or need to move towards the beginning of the command to retype or add additional commands, simply hit
One last thing I've learned recently when working with Debian I thought might be helpful to share. If you are using the well-known NetworkManager, don't manually edit the
Oh yeah, and if you'd like to use the GUI wrapper for NetworkManager, simply type
So nothing too exciting. Just a few helpful tips for growing and expanding your Linux experience and expertise. Look for the CPU upgrade soon! I'm also running into issues with that as well, but I'm more hopeful I'll be able to resolve those quicker than the nouveau drivers. Not only that, the CPU is such a sloth, that an upgrade should help move the rest of my posts on the upgrades along much faster.
Right now, I feel like I'll have a better chance of getting 3D acceleration working with the nVidia Quadro card on the G5, so look for updates on that over on the PowerPCLiberation blog.
On an unrelated note, I want to take a few minutes to discuss command aliases you can setup for your bash shell environment. I've been meaning to do this on my Debian installs for some time as I've set them up on all the Linux machines at my full-time job. Basically you can create aliases to make shortened versions of longer commands you run on a regular basis. For example instead of typing the following:
sudo apt-get update && sudo apt-get upgradeYou can shorten this command to simply the word
update, which when ran will actually run the command above. To get started with aliases, you'll want to change directories into your home directory. Create/open a new file you'll call .bash_aliases. The syntax for setting up a new alias is as follows:alias [alias_name]='[full command you are aliasing]'So for the example I provided above, I would set it up like so:
alias update='sudo apt-get update && sudo apt-get upgradeUpon saving the changes, you should immediately be able to make use of the new alias. To test it out type
update and watch as this short one word command runs both the update and upgrade commands!Here are just a couple of others I usually implement on each of my installs.
alias cdh='cd /home/[username]'alias cde='cd /etc'alias cdv='cd /var'alias ls='ls -alh'They may not do a whole lot, but the small amount of time these aliases can save does add up over time in the same way the utility kupfer does. I'd encourage you to come up with your own. Feel free to share them in the comments below as they may be helpful for the rest of us.
Also, if you happen to run a really long command and say forgot to add sudo to the beginning of it or need to move towards the beginning of the command to retype or add additional commands, simply hit
Command + a (or Control + a if you haven't swapped out the Command and Control keys). This moves your cursor to the beginning of the command. I happen to use this quite a bit.One last thing I've learned recently when working with Debian I thought might be helpful to share. If you are using the well-known NetworkManager, don't manually edit the
/etc/network/interfaces file with network interface configurations or vice versa. The two separate configurations will conflict with each other and produce unusual, unpredictable, and unusable results. For some time now, I couldn't figure out why I couldn't just plug in an ethernet cable to any of my PPC machines and receive an IP via DHCP without restarting network services or rebooting with the cable already plugged into the machine. Such a simple concept, but it took me awhile to figure out.Oh yeah, and if you'd like to use the GUI wrapper for NetworkManager, simply type
nm-connection-editor. That right there might be an excellent candidate for creating an alias in order to shorten it up. Of course you can also tab to auto-complete the command, but the choice is yours.So nothing too exciting. Just a few helpful tips for growing and expanding your Linux experience and expertise. Look for the CPU upgrade soon! I'm also running into issues with that as well, but I'm more hopeful I'll be able to resolve those quicker than the nouveau drivers. Not only that, the CPU is such a sloth, that an upgrade should help move the rest of my posts on the upgrades along much faster.
Tuesday, May 12, 2015
Pimp My Quicksilver - Part III: CD/DVD Drive
Welcome to Part II of the Pimp my Quicksilver series where I will be upgrading the CD/DVD drive. Again, this particular component may not be the most exciting or even often used, but I felt it necessary to include.
Here is a System Profile screenshot with the old drive:

As you can see, the drive is not capable of reading or writing DVDs, but does support the reading and writing of CDs. This is the stock Superdrive that shipped with the Quicksilver (QS). Apple reported that this drive is capable of reading CDs at 32X while being able to write to CD-Rs at 24X, which is what I will be using for testing.
Here is a System Profile screenshot of the newly installed drive.

The new drive from MCE, which they had to custom build as it is now an older model, is capable of burnings CDs at 48X. So we should see a decent sized chunk of time cut out when burning files and ISOs to CD. Of course, this MCE drive also supports the burning of the different DVD media types including Dual Layer (DL) at up to 22X depending on the time of DVD media. Definitely a benefit over having no DVD reading or burning capabilities at all.
One last significant difference you may have noticed is the difference in the cache sizes between the two. The stock drive had an 8 MB cache whereas the replacement one only has a 512 KB cache. I'm not all too familiar with caches on CD/DVDs drives, but either way it shouldn't really hurt the CD burn tests I will be performing. I'm positive the cache comes more in to play with reading files and playback performance.
I plan on burning a copy of the latest version of NetBSD 6.5.1 to install on an old purple G3 iMac. In a previous post, I discussed the possibility of installing NetBSD (I might have even said FreeBSD) onto my PowerBook 1400CS only to read that it is not actually officially supported as it is one of the older Mac models with the NuBus architecture. Oh well. I still want to give NetBSD a shot, so that's why its going on the iMac.
The NetBSD ISO I downloaded from here, was 313920 KB (~307 MB if you were wondering) in size. Instead of burning it the boring old fashioned way in OS X using Disk Utility or the Burn application, I decided to burn the ISO to a CD from the CLI while booted into Jessie using the simple and easy to use command line tool
To burn an ISO using wodim, simply run the following:
Here are the results:
Stock CD Drive - 147.15s
Upgrade MCE Drive - 100.18s
So we have managed to shave off at least 32% of time when burning CDs. A welcomed improvement. Woohoo!
In other news, I have ordered both a 1.8 GHz Sonnet CPU and a dual 1.4 GHz Giga Designs CPU off of eBay. I wasn't expecting to win the 1.8 GHz, but received notification late Sunday morning that my bid was the highest. Again.. oh well. It will be nice to test out and compare with the Giga Designs CPU. Both are compatible with the QS although from what I've read the Sonnet CPU requires a specific firmware patch from Sonnet that is no longer available on their website. :(
Stay tuned for Part IV covering the CPU upgrade from a single 800 GHz CPU to a dual 1.4 GHz CPU. Things should start to become quite interesting from here on out.
Here is a System Profile screenshot with the old drive:

As you can see, the drive is not capable of reading or writing DVDs, but does support the reading and writing of CDs. This is the stock Superdrive that shipped with the Quicksilver (QS). Apple reported that this drive is capable of reading CDs at 32X while being able to write to CD-Rs at 24X, which is what I will be using for testing.
Here is a System Profile screenshot of the newly installed drive.

The new drive from MCE, which they had to custom build as it is now an older model, is capable of burnings CDs at 48X. So we should see a decent sized chunk of time cut out when burning files and ISOs to CD. Of course, this MCE drive also supports the burning of the different DVD media types including Dual Layer (DL) at up to 22X depending on the time of DVD media. Definitely a benefit over having no DVD reading or burning capabilities at all.
One last significant difference you may have noticed is the difference in the cache sizes between the two. The stock drive had an 8 MB cache whereas the replacement one only has a 512 KB cache. I'm not all too familiar with caches on CD/DVDs drives, but either way it shouldn't really hurt the CD burn tests I will be performing. I'm positive the cache comes more in to play with reading files and playback performance.
I plan on burning a copy of the latest version of NetBSD 6.5.1 to install on an old purple G3 iMac. In a previous post, I discussed the possibility of installing NetBSD (I might have even said FreeBSD) onto my PowerBook 1400CS only to read that it is not actually officially supported as it is one of the older Mac models with the NuBus architecture. Oh well. I still want to give NetBSD a shot, so that's why its going on the iMac.
The NetBSD ISO I downloaded from here, was 313920 KB (~307 MB if you were wondering) in size. Instead of burning it the boring old fashioned way in OS X using Disk Utility or the Burn application, I decided to burn the ISO to a CD from the CLI while booted into Jessie using the simple and easy to use command line tool
wodim. This Debian Wiki page has some perfect documentation on how to use wodim and what other CD burning applications are available, but man pages are an excellent resource as well. For a measurement of performance, I will record the time it takes to burn the ISO once using each drive and report the results, which again, should speak for themselves and be quite self-explanatory. For the media type, I am utilizing a 700 MB Memorex CD-R.To burn an ISO using wodim, simply run the following:
wodim -dao [InsertFileNameHere].isoHere are the results:
Stock CD Drive - 147.15s
Upgrade MCE Drive - 100.18s
So we have managed to shave off at least 32% of time when burning CDs. A welcomed improvement. Woohoo!
In other news, I have ordered both a 1.8 GHz Sonnet CPU and a dual 1.4 GHz Giga Designs CPU off of eBay. I wasn't expecting to win the 1.8 GHz, but received notification late Sunday morning that my bid was the highest. Again.. oh well. It will be nice to test out and compare with the Giga Designs CPU. Both are compatible with the QS although from what I've read the Sonnet CPU requires a specific firmware patch from Sonnet that is no longer available on their website. :(
Stay tuned for Part IV covering the CPU upgrade from a single 800 GHz CPU to a dual 1.4 GHz CPU. Things should start to become quite interesting from here on out.
Subscribe to:
Posts (Atom)