I decided it would be more than worth it to put together a three part series on backing up your PPC Linux machines. I myself use of combination of PowerPC machines, including a G4 PowerBook, G4 PowerMac QS, dual core G5 PowerMac, and a G4 iBook. Much of the configurations between the 4 are quite similar, but different enough that I'd like the peace of mind knowing that these configurations and other valuable data are backed up and backed up on a scheduled basis. Part I will cover creating bootable hard drive clones; Part II will cover available software that could automate backups to an external drive or a storage location out on the network; Part III will cover how to create more of a DIY solution using custom scripts and automation tools. I'm going to refrain from using any cloud/offsite backup solutions as they usually cost money and require my personal information.
So onto Part I covering the process involved in creating an exact bootable clone of your existing hard drive. We are going to use the well-known and trusted command line tool dd to complete this task. This is quite the powerful tool that at its basic core simply reads and writes files. With this in mind, this tool should allow us to either make a copy of the entire drive or a single partition if we would like.
As an example, I am going to be cloning my 40 GB Maxtor HD in the G4 PowerMac GS containing my Debian install. I'm going to clone the entire drive instead of just specific partitions, so in essence, it should be an exact bootable clone. I would like to use a drive of the same vendor and capacity, but I do not exactly have many spare 3.5" IDE drives laying around, so for this task I am going to clone the existing drive to a 40 GB Western Digital (WD400JB/WD Cavier SE) HD. The QS has the ability to mount two IDE drives, but I already have both occupied, so I turned to my IDE/SATA to USB 2.0 adapter kit to attach the backup drive.
Below is a screenshot of my current Debian disk and its existing partitions and partition layout. After the cloning operation, which should expect to see the exact same layout on the hard drive clone.
Once your external drive is attached and recognized by your system, you will want to figure out its file name in
/dev. From my reading of the Debian installation guide, all disks detected by the system start with sd (I'm assuming this stands for SCSI device or something similar?) and the first drive is detected as a, the second b, third c, and so on. So for my setup, the external drive happens to be the third attached disk, so its filename is /dev/sdc.Now it is time to run the disk cloning command:
sudo dd if=/dev/sda of=/dev/sdcAs you will notice, this command requires root privileges. The 'if" part stands for input file and if you are catching on, "of" stands for output file. We are not reading or writing just files, but technically a drive itself is a file (e.g.
/dev/sda) within the EXT4 file system. Hopefully that makes sense. Your input and output files will vary depending on your system setup. If you need help identifying this information or if you are just wanting to copy certain partitions, leave me a comment below.The amount of time it takes to clone the drive or partition depends on both the size and speed of the drive, but expect it to take quite a bit of time. For this 40 GB drive clone, it took between 4-5 hours total (I did not time it, although I should for comparisons in drive read/write performance when upgrading to an SSD).
Here are the results from my cloning process:
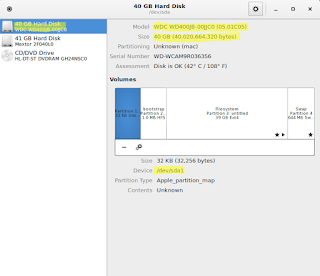
dd: writing to ‘/dev/sdc’: No space left on device78165361+0 records in78165360+0 records out40020664320 bytes (40 GB) copied, 8500.46 s, 4.7 MB/sAs you can see there are no error messages, but simply a warning that the destination file ran out of space. This is because my Debian system sees the Maxtor as having 41 GB and the Western Digital as having a 40 GB capacity. Either way, there is no harm in this case. Here is a screenshot of the Western Digital HD after the clone.
I shutdown my system and pulled the live Debian HD and replaced it with the cloned Western Digital HD to test out the backup. Here is my last screenshot of this post showing us with WD drive booted and located at /dev/sda.
So a definite success. Now that I have this cloning process down, I will do the same with the other PPC machines and schedule it to be done on a periodic basis.
Of course, you'll want to tag team this backup approach with another such as backing up with a piece of backup software or writing shell scripts to do the backups for you, which again happens to be part II and part III of this series respectively. As I learned early on in computing, a smart man backups up his data, but a wise man makes backups for his backups.


